Re-blogged from Ellie and Mac in two parts. Link to part one for grading for children here and link to part two grading for adults here. This is the original content and written by me but publish by Ellie and Mac and then published back here so I can have the information here for me as well.
Hello sewing friends! It's me, Nellie, from Sorry About the Mess, again.
Let's talk a moment about patterns and how they fit. I'll be honest, I have yet to find a pattern for ANYTHING that fits me perfectly without any adjustments, okay, well maybe the Snuggle Blanket (all patterns with links are affiliated and I will earn a small commission if you purchase them using my link, except for this pattern, because it's free! 😁) pattern would fit without alterations, but that might be pushing it. But honestly, even if my measurements fit in a specific size there are still lots of little adjustments that can be made to make the pattern fit better. And I don't fit into just one size. My full bust is an XXL and my waist and hips are 2XL, so to get things to fit me, I have to do some pattern grading.
Pattern grading refers to the technique that makes the pattern match your measurements. Every body comes in a different size and shape with different curves and straight parts and different long and short places, but patterns generally come in just a few basic sizes all with the same shape. So learning how to grade will make your patterns fit worlds better!
Now, as with everything I talk about, we are each individuals and we each will find own way of doing things. This is just one of my ways of grading, there are others. I am not saying the others are inaccurate, I'm just saying they are different. And you should use the way that works best for you and your body or the body you are sewing for.
Let's start with kids pattern grading! It's a whole different ball game (should I say a different bobbin color because it's a sewing tool? 😂😂😂) from adult pattern grading.
This is the Kids Wild Wide Leg Pants. I'd like to make a pair for my little man. But he has the craziest measurements!

As you can see, he's tall and skinny for his age and these pants, if I made them for length would drown him. Actually, pretty sure they would do similar to RTW (ready to wear) and fall right off of him. And I just can't have that with something I make. So it's time to grade!
Here is the front leg piece, we are going to start with it. To make grading easier, I just printed the sizes I needed, thank goodness for layers! Size 4 for length, size 12 month for his hip. I also have a third line printed, the 2T line. Now, I do this because a difference of 4 sizes is a LOT and with my little man, the difference would just make him look longer and more skinny, so I like to split the difference. This is a technique I use any time there is more then a 3 size difference in length and width. Then for my little man, I will just use the 12 month elastic in his 2T waistband on his size 4 length pants.

For transparency's sake, I am going to confess that I will be using these pants as part of a Halloween costume, so it's going to be made with fleece, so I sized up to make up for the lack of stretch in the fleece, so the sizes I am tracing will not align with his actual sizes. Please keep that in mind with the final photos. Thank you for understanding!
Back to the grading. I need the 5 length and the 3T width, so I am going to trace all of the 3T vertical lines blue and all of the 5 horizontal lines red. There is an area on both the top and the bottom of the pattern where the lines don't line up.
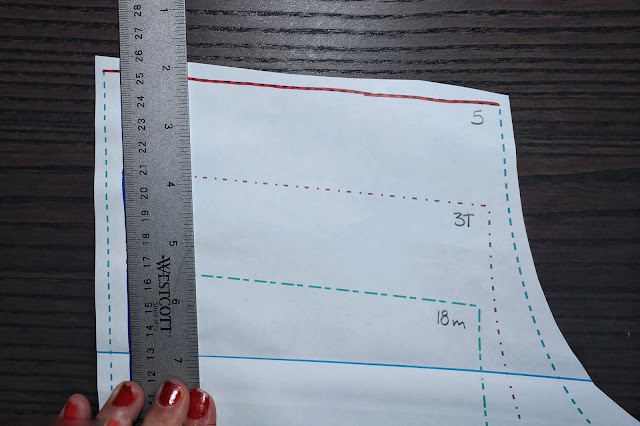

I use a straight edge to connect the outer seam and a gentle curve to make the inseam of the 3T go to the original crotch curve point then follow the size 5 crotch curve.

Lets talk pockets real quick. Patch pockets are great because they just go on top with whatever placement you want, but when using the placement guide and the pattern pieces the process is very similar, trace the vertical lines of one size and the horizontal lines of the other. In my case it's the top and bottom in 5 and in red. And the left and right side of size 3T in blue. Do this for both the pocket and the pocket top. And then I am going to use the pocket placement for the size 4 so the height of the pocket is correct.


Then I am going to do the exact same thing to the back pants piece and the cuff. But I need to show you how to grade the opposite way first. What if, like my sweet little nephew (who's photos, unfortunately, wont be seen in this blog), the child's measurements put them into a size 3T for length and 5 for width. First, cuss those dang short little legs (I know the feeling well!). And then trace all the vertical 5 lines in red and the horizontal 3T lines in blue.

When it comes to the crotch curve when grading out, the 3T curve needs to used, but the vertical lines are on the 5 size, so stop the leg when it becomes level with the 5 and then I will have to carefully redraw the crotch curve to get the right shape. How did I do?

The last two pieces you need to worry about are very simple, the waistband and the drawstring. For the waistband, I am just going to use the 3T waistband. I'm not going to change anything. Same with the drawstring. I will just use the 3T length of drawstring and change nothing. I will, however use the 12 month elastic length, yep, even with the sizing up for using fleece, because I need these to stay up on his tush while he's running from house to house this Halloween.
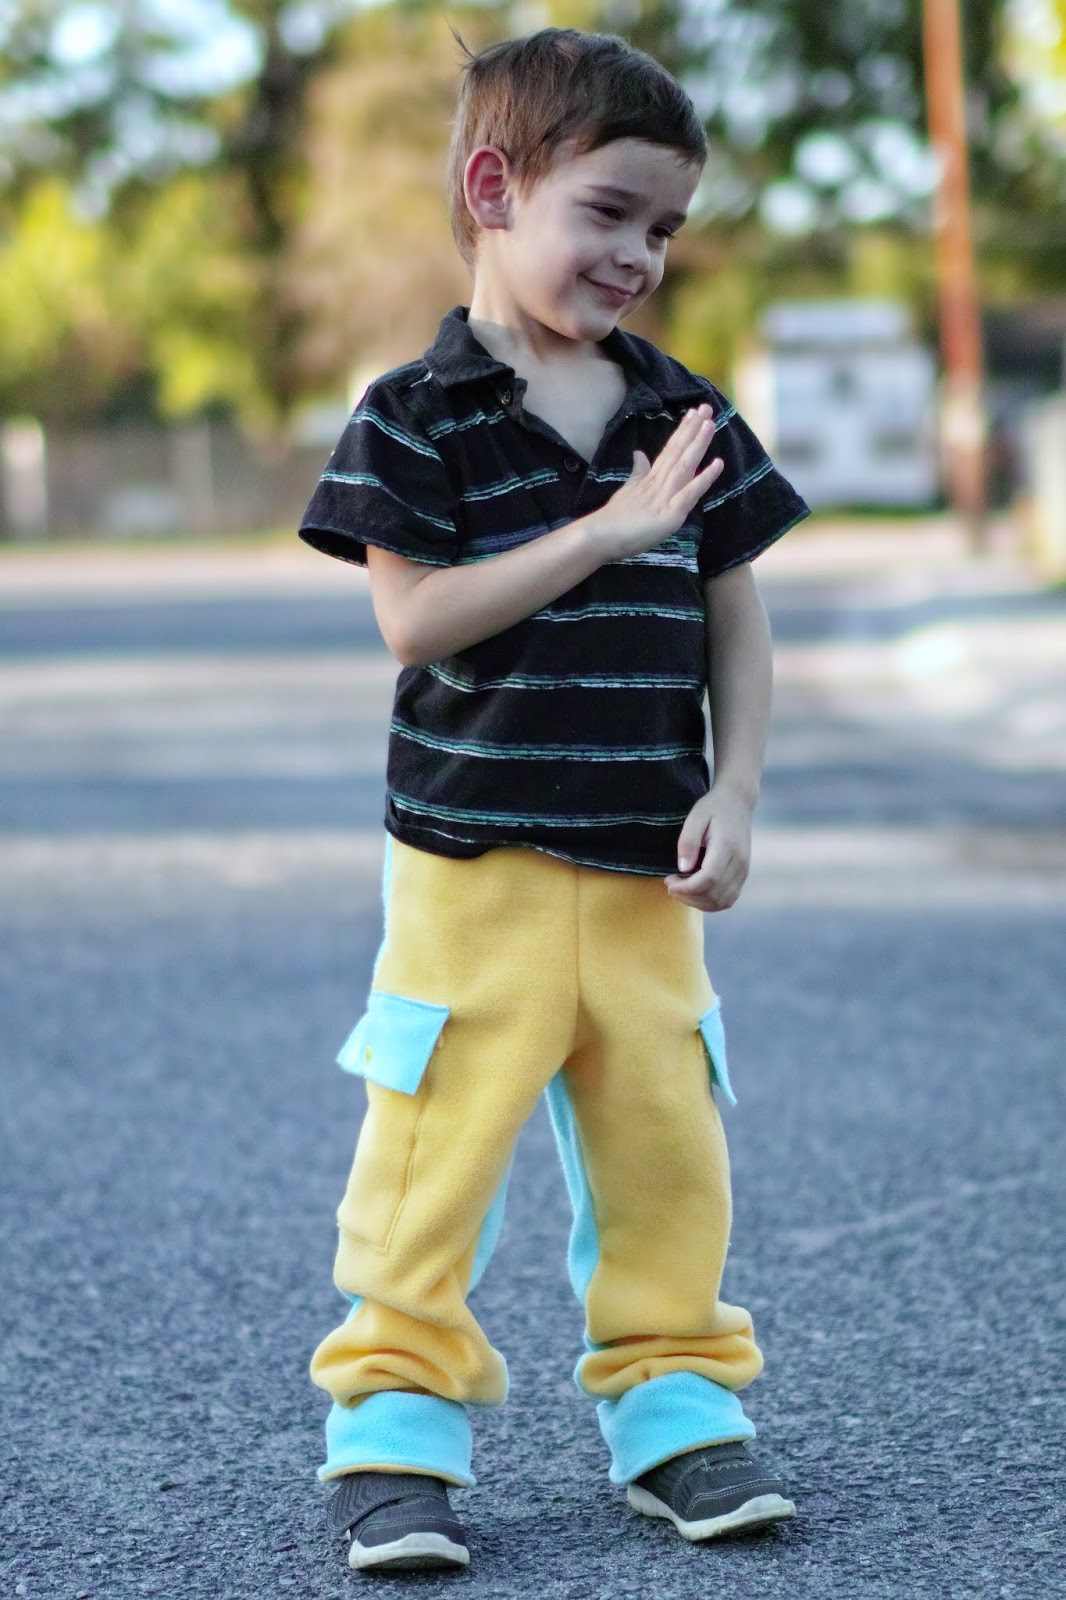
And here are the final result for my little one. Isn't he cute in his new Oppopus pants? He is so proud of these pants! He even got to pick out the fabric on his very own!


Pants are easy! Shirts, now they are a little bit more difficult, but not terribly much so. Let's take a look at the Kid's Swag Hoodie. I adore the raglan sleeves and split hem on this one! Again, we are going to grade this one for my youngest.

I have also sized up this pattern once, because this hoodie will be part of his Halloween costume and made out of fleece so he doesn't get too cold in this crazy Idaho October weather. So it may not fit exactly as intended, but it will fit the way I want it to, which is kind of the point, right?
Because there are more measurement points on a shirt there are more places to grade. I like to play Dot to Dot and put a literal point at each place where an adjustment needs to take place.
My orange dots are kind of "dirty" looking because I drew them in with pencil first, sorry. I have one at the center of the neckline, at the top of the shoulder, at the place where the 3T and 5 cross on the armscye, one the 3T line about an inch from the bottom of the armscye (I'm guessing that's an approximate chest location. Then I folded my pattern piece up so that the hemline with even with the bottom of the armscye for a general waist line and added a point, then again at the bottom hem on size 5.


Now, I'm going to trace over the neckline and armscye with red (just like the pants) and across the bottom hem also with red, stopping at the orange dots that line up with the size 3T side seam. At this point a decision needs to be made about grading in at the waist. There are lots of reasons why I might want to grade in at the waist, for a more fitted shape, for a more feminine shape, perhaps to just keep to the original intended design and fit. If that is the case then your side seam would look similar to the green one.

But I'm using fleece and want a more relaxed fit so that warm clothes can be worn under this hoodie, so I'm going to just draw straight down the 3T, like the blue line.

Real quick, lets talk about grading the other way, going from a 3T in height to a 5 in width. Do the same with the dots. The red line is traced across the 3T on the neckline and armscye (can it still be called a scye if it doesn't circle the arm?) and the side seam in blue.

Sleeves can be a bugger to grade. Let's do this thing! First trace the length, so the sleeve cap and the hem (traced in red). And then trace the width, from side to side, of the sleeve (in blue).

You will notice that the shape of the sleeve cap has changed. But we changed the armscye, too. If done correctly, the two will have been changed in the same way and the pieces should fit together as well as the original.

Do the same thing when grading out from 3T to 5 on the sleeve

Okay, the bodice and the sleeves are done, but what about the hood, pocket, cuff and waistband? Well, lets go through that really quick. The hood, and this would hold true if you were using a neckband as well, has to be the same size as the neckline. So, for my son, the neckline was a 5, so the hood needs to be a 5. If the hood seems too large, go ahead and grade the hood to be shorter.

Notice how the curve of the hood very gradually and slowly merges from 5 to 3T? That's how all the adjustments should look, slow and easy shifts from one size to the other.
The width of the cuff depends on the width of the sleeve. So my son will have a 3T cuff while my nephew will have a 5.

The waistband will be figured the same way. The width of the shirt hem will determine the width of the waistband. So my son will have a 3T waistband while my nephew would need a 5.

Kangaroo pockets are my favorite! And the best part is that if you happen to forget to grade it, that's okay, it will probably look just fine. And pretty much any size pocket will look just fine on any size hoodie. But if you want to be on the safe and technical side, and I'm totally not going to judge you either way, the kangaroo pocket needs to be graded exactly the same way your graded the bodice. Choose the height and trace the top and bottom.

Choose the width and trace the out seam, or you can get even more technical and trace the 3T up to the 5 and then retrace the pocket opening. I did both options but they are both in blue. Yeah, not my smartest move, hope you can tell.
And check this kid out! Okay, so I have to admit that it's a little matchy matchy, but it's for Halloween and totally not done! Not in the least! Really, he is the cutest not-quite-an-Octopus-yet I have ever seen!


Time to switch gears over to adult patterns. Since we just finished with a kids shirt, an adult shirt wont be too terribly difficult. But lets take the difficulty level up one by adjusting the Adults Discoverer Tee.

I would like to note, before we get started, that adult patterns cannot be graded for height like kids patterns can be, because they are all drafted for the same height. Adjusting for height is a separate adjustment from size grading and is done after you grade, actually. Here is a link to a great starting place for learning how to adjust for height from Manda.
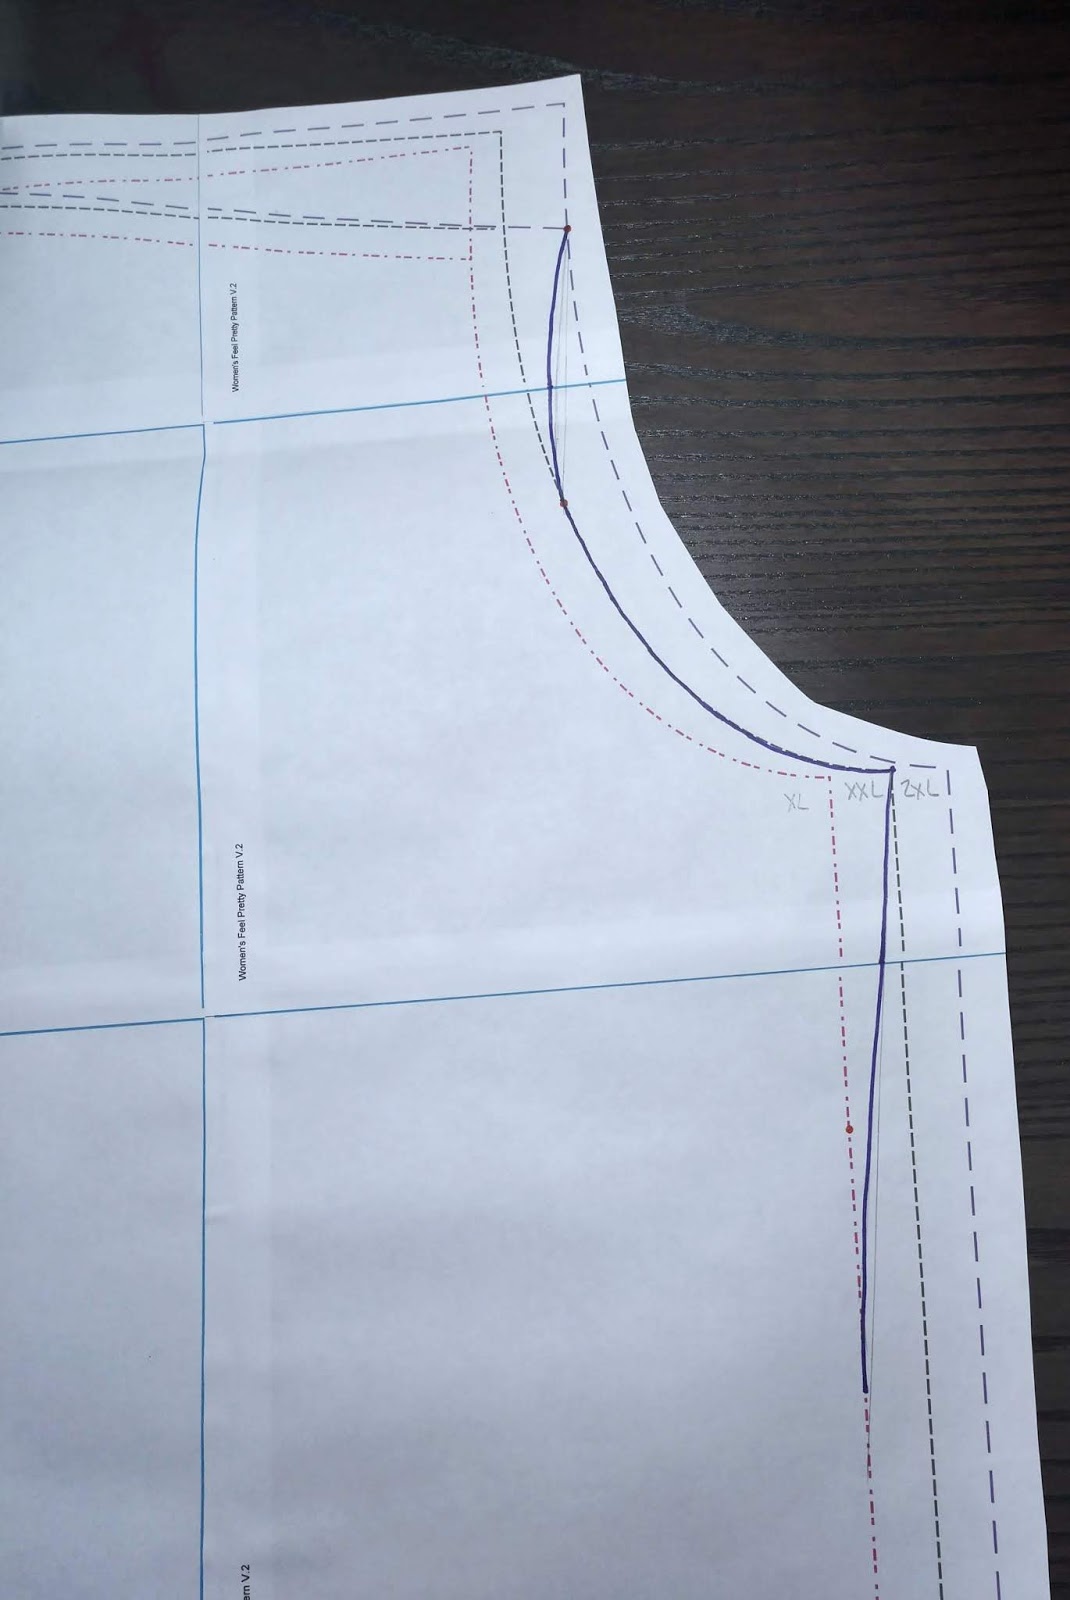
Back to the Discoverer, where we note that the bodice is in two pieces. So, the first thing I am going to do is attach the bodice top to the bodice bottom overlapping by the seam allowance, 1/4 inch. And then I'll treat this as one solid piece for the pattern grading. Because of the curved shape, this isn't the easiest pattern to line up with multiple sizes, but the outcome will be worth it.

Now it's time to play Dot to Dot again. Place a dot at the bust (which can be located about 1.5 inches below the bottom of the armscye) for size XXS and a dot at the waist for S (again I folded the pattern in half to find this location, it's a very rough placement) and one at the hip again for XXS. Then I will use my ruler to draw a light line with pencil from dot to dot.

In this case, the pattern has a bit of an A line and bringing it back into the hip after grading out from the waist would actually eliminate that shape, so in this case I am going to stay graded out to the small and not bring the top back in at the hip. When doing this the other direction and grading in for the waist, on the other hand, the shape is a little more natural and I would definitely keep this grading.

So, this is the way that I will end up grading this Discoverer. It's a little rough and I might smooth out the curve at the waist a little more, but those are really more of my personal opinion on the fit rather then any kind of "rule" because in sewing, there really aren't any rules, as long as you like it, that's all that matters.

Now the great thing about grading the Discoverer, you don't have to do the same thing to the back as you just did to the front because it's already done! Yay! You will use the same sleeve and neckband as top of the bodice, so an XXS for me. And when you get down to the waistband, my pattern wont have one, but if it did, I would use the S waistband because it's the size that coincides with the bottom line of the top.
And here is a finished shirt with this grading! It turned out lovely!

Now we end with the Adult Feel Pretty Pants in my size. I've had the pattern for a while and I'm looking forward to sewing it up! Only, I am going to need to grade them for my measurements.

Before beginning to play Dot to Dot, I want to mention that I already know that I have trouble getting my pants to fit the way I like, I always end up needing to size down in the legs to feel comfortable, so I am going to grade down immediately, without even making a muslin 🤭 🤫 and without a measurement chart to say I'm being accurate. With that admission out of the way, I start to play Dot to Dot, placing a dot at the waist for 2XL (low rise option for me), the hip for XXL (which is located about the bottom third of the crotch curve) and the rest at XL (I find I like to go in right about mid thigh). I mimic these same dots on the out seam before starting to draw long straight, smooth lines between each dot and then I retrace my lines to be a similar shape to the original pattern.


There you have an approximation of how my grading will look. You will see that on the inseam I carried the line down quite a bit past the dot, I did this to create a smooth line. You may also notice that my out seam didn't even reach the orange dot before it was smoothly running on top of the XL line. Both of these things are okay. It's the way I like to grade, and it works for me. You will find what is right for you.
Here is an example of what grading out what look like on Feel Pretty pants with legs of 2XL, hip of XXL and waist of XL.

Deciding a waistband is the same as how it's chosen for the kids pants, use the size waistband that corresponds to the size waist you used. So my waist was a 2XL, so I need to use the 2XL waistband with no adjustments. The graded out pants had a waist of XL so the waist band would need to be an XL waistband.
And now I'm off to sew some Feel Pretty Pants, but not before I finish my adjustments!

Grading is not a fool proof way to get the perfect fit! But it is a great place to start, a good place to begin learning how to make your patterns work for you and compliment your figure and style! Now go give it a try and let me know how it turns out. I'll be seeing you in the Facebook Group be sure to tag and/or mention me because I'd love to see how your creations work out!
The links provided in this post may be affiliate links where I receive a small commission from your purchase at no extra cost to you. Thank you for supporting me, my blogging and my sewing!
Hello sewing friends! It's me, Nellie, from Sorry About the Mess, again.
Let's talk a moment about patterns and how they fit. I'll be honest, I have yet to find a pattern for ANYTHING that fits me perfectly without any adjustments, okay, well maybe the Snuggle Blanket (all patterns with links are affiliated and I will earn a small commission if you purchase them using my link, except for this pattern, because it's free! 😁) pattern would fit without alterations, but that might be pushing it. But honestly, even if my measurements fit in a specific size there are still lots of little adjustments that can be made to make the pattern fit better. And I don't fit into just one size. My full bust is an XXL and my waist and hips are 2XL, so to get things to fit me, I have to do some pattern grading.
Pattern grading refers to the technique that makes the pattern match your measurements. Every body comes in a different size and shape with different curves and straight parts and different long and short places, but patterns generally come in just a few basic sizes all with the same shape. So learning how to grade will make your patterns fit worlds better!
Now, as with everything I talk about, we are each individuals and we each will find own way of doing things. This is just one of my ways of grading, there are others. I am not saying the others are inaccurate, I'm just saying they are different. And you should use the way that works best for you and your body or the body you are sewing for.
Let's start with kids pattern grading! It's a whole different ball game (should I say a different bobbin color because it's a sewing tool? 😂😂😂) from adult pattern grading.
This is the Kids Wild Wide Leg Pants. I'd like to make a pair for my little man. But he has the craziest measurements!

Here is the front leg piece, we are going to start with it. To make grading easier, I just printed the sizes I needed, thank goodness for layers! Size 4 for length, size 12 month for his hip. I also have a third line printed, the 2T line. Now, I do this because a difference of 4 sizes is a LOT and with my little man, the difference would just make him look longer and more skinny, so I like to split the difference. This is a technique I use any time there is more then a 3 size difference in length and width. Then for my little man, I will just use the 12 month elastic in his 2T waistband on his size 4 length pants.

For transparency's sake, I am going to confess that I will be using these pants as part of a Halloween costume, so it's going to be made with fleece, so I sized up to make up for the lack of stretch in the fleece, so the sizes I am tracing will not align with his actual sizes. Please keep that in mind with the final photos. Thank you for understanding!
Back to the grading. I need the 5 length and the 3T width, so I am going to trace all of the 3T vertical lines blue and all of the 5 horizontal lines red. There is an area on both the top and the bottom of the pattern where the lines don't line up.


I use a straight edge to connect the outer seam and a gentle curve to make the inseam of the 3T go to the original crotch curve point then follow the size 5 crotch curve.

Lets talk pockets real quick. Patch pockets are great because they just go on top with whatever placement you want, but when using the placement guide and the pattern pieces the process is very similar, trace the vertical lines of one size and the horizontal lines of the other. In my case it's the top and bottom in 5 and in red. And the left and right side of size 3T in blue. Do this for both the pocket and the pocket top. And then I am going to use the pocket placement for the size 4 so the height of the pocket is correct.


Then I am going to do the exact same thing to the back pants piece and the cuff. But I need to show you how to grade the opposite way first. What if, like my sweet little nephew (who's photos, unfortunately, wont be seen in this blog), the child's measurements put them into a size 3T for length and 5 for width. First, cuss those dang short little legs (I know the feeling well!). And then trace all the vertical 5 lines in red and the horizontal 3T lines in blue.

When it comes to the crotch curve when grading out, the 3T curve needs to used, but the vertical lines are on the 5 size, so stop the leg when it becomes level with the 5 and then I will have to carefully redraw the crotch curve to get the right shape. How did I do?

The last two pieces you need to worry about are very simple, the waistband and the drawstring. For the waistband, I am just going to use the 3T waistband. I'm not going to change anything. Same with the drawstring. I will just use the 3T length of drawstring and change nothing. I will, however use the 12 month elastic length, yep, even with the sizing up for using fleece, because I need these to stay up on his tush while he's running from house to house this Halloween.
And here are the final result for my little one. Isn't he cute in his new Oppopus pants? He is so proud of these pants! He even got to pick out the fabric on his very own!

Pants are easy! Shirts, now they are a little bit more difficult, but not terribly much so. Let's take a look at the Kid's Swag Hoodie. I adore the raglan sleeves and split hem on this one! Again, we are going to grade this one for my youngest.

I have also sized up this pattern once, because this hoodie will be part of his Halloween costume and made out of fleece so he doesn't get too cold in this crazy Idaho October weather. So it may not fit exactly as intended, but it will fit the way I want it to, which is kind of the point, right?
Because there are more measurement points on a shirt there are more places to grade. I like to play Dot to Dot and put a literal point at each place where an adjustment needs to take place.
My orange dots are kind of "dirty" looking because I drew them in with pencil first, sorry. I have one at the center of the neckline, at the top of the shoulder, at the place where the 3T and 5 cross on the armscye, one the 3T line about an inch from the bottom of the armscye (I'm guessing that's an approximate chest location. Then I folded my pattern piece up so that the hemline with even with the bottom of the armscye for a general waist line and added a point, then again at the bottom hem on size 5.


Now, I'm going to trace over the neckline and armscye with red (just like the pants) and across the bottom hem also with red, stopping at the orange dots that line up with the size 3T side seam. At this point a decision needs to be made about grading in at the waist. There are lots of reasons why I might want to grade in at the waist, for a more fitted shape, for a more feminine shape, perhaps to just keep to the original intended design and fit. If that is the case then your side seam would look similar to the green one.

But I'm using fleece and want a more relaxed fit so that warm clothes can be worn under this hoodie, so I'm going to just draw straight down the 3T, like the blue line.

Real quick, lets talk about grading the other way, going from a 3T in height to a 5 in width. Do the same with the dots. The red line is traced across the 3T on the neckline and armscye (can it still be called a scye if it doesn't circle the arm?) and the side seam in blue.

Sleeves can be a bugger to grade. Let's do this thing! First trace the length, so the sleeve cap and the hem (traced in red). And then trace the width, from side to side, of the sleeve (in blue).

You will notice that the shape of the sleeve cap has changed. But we changed the armscye, too. If done correctly, the two will have been changed in the same way and the pieces should fit together as well as the original.

Do the same thing when grading out from 3T to 5 on the sleeve

Okay, the bodice and the sleeves are done, but what about the hood, pocket, cuff and waistband? Well, lets go through that really quick. The hood, and this would hold true if you were using a neckband as well, has to be the same size as the neckline. So, for my son, the neckline was a 5, so the hood needs to be a 5. If the hood seems too large, go ahead and grade the hood to be shorter.

Notice how the curve of the hood very gradually and slowly merges from 5 to 3T? That's how all the adjustments should look, slow and easy shifts from one size to the other.
The width of the cuff depends on the width of the sleeve. So my son will have a 3T cuff while my nephew will have a 5.

The waistband will be figured the same way. The width of the shirt hem will determine the width of the waistband. So my son will have a 3T waistband while my nephew would need a 5.

Kangaroo pockets are my favorite! And the best part is that if you happen to forget to grade it, that's okay, it will probably look just fine. And pretty much any size pocket will look just fine on any size hoodie. But if you want to be on the safe and technical side, and I'm totally not going to judge you either way, the kangaroo pocket needs to be graded exactly the same way your graded the bodice. Choose the height and trace the top and bottom.

Choose the width and trace the out seam, or you can get even more technical and trace the 3T up to the 5 and then retrace the pocket opening. I did both options but they are both in blue. Yeah, not my smartest move, hope you can tell.
And check this kid out! Okay, so I have to admit that it's a little matchy matchy, but it's for Halloween and totally not done! Not in the least! Really, he is the cutest not-quite-an-Octopus-yet I have ever seen!


Time to switch gears over to adult patterns. Since we just finished with a kids shirt, an adult shirt wont be too terribly difficult. But lets take the difficulty level up one by adjusting the Adults Discoverer Tee.

I would like to note, before we get started, that adult patterns cannot be graded for height like kids patterns can be, because they are all drafted for the same height. Adjusting for height is a separate adjustment from size grading and is done after you grade, actually. Here is a link to a great starting place for learning how to adjust for height from Manda.
Back to the Discoverer, where we note that the bodice is in two pieces. So, the first thing I am going to do is attach the bodice top to the bodice bottom overlapping by the seam allowance, 1/4 inch. And then I'll treat this as one solid piece for the pattern grading. Because of the curved shape, this isn't the easiest pattern to line up with multiple sizes, but the outcome will be worth it.

Now it's time to play Dot to Dot again. Place a dot at the bust (which can be located about 1.5 inches below the bottom of the armscye) for size XXS and a dot at the waist for S (again I folded the pattern in half to find this location, it's a very rough placement) and one at the hip again for XXS. Then I will use my ruler to draw a light line with pencil from dot to dot.

In this case, the pattern has a bit of an A line and bringing it back into the hip after grading out from the waist would actually eliminate that shape, so in this case I am going to stay graded out to the small and not bring the top back in at the hip. When doing this the other direction and grading in for the waist, on the other hand, the shape is a little more natural and I would definitely keep this grading.

So, this is the way that I will end up grading this Discoverer. It's a little rough and I might smooth out the curve at the waist a little more, but those are really more of my personal opinion on the fit rather then any kind of "rule" because in sewing, there really aren't any rules, as long as you like it, that's all that matters.

Now the great thing about grading the Discoverer, you don't have to do the same thing to the back as you just did to the front because it's already done! Yay! You will use the same sleeve and neckband as top of the bodice, so an XXS for me. And when you get down to the waistband, my pattern wont have one, but if it did, I would use the S waistband because it's the size that coincides with the bottom line of the top.
And here is a finished shirt with this grading! It turned out lovely!

Now we end with the Adult Feel Pretty Pants in my size. I've had the pattern for a while and I'm looking forward to sewing it up! Only, I am going to need to grade them for my measurements.

Before beginning to play Dot to Dot, I want to mention that I already know that I have trouble getting my pants to fit the way I like, I always end up needing to size down in the legs to feel comfortable, so I am going to grade down immediately, without even making a muslin 🤭 🤫 and without a measurement chart to say I'm being accurate. With that admission out of the way, I start to play Dot to Dot, placing a dot at the waist for 2XL (low rise option for me), the hip for XXL (which is located about the bottom third of the crotch curve) and the rest at XL (I find I like to go in right about mid thigh). I mimic these same dots on the out seam before starting to draw long straight, smooth lines between each dot and then I retrace my lines to be a similar shape to the original pattern.


There you have an approximation of how my grading will look. You will see that on the inseam I carried the line down quite a bit past the dot, I did this to create a smooth line. You may also notice that my out seam didn't even reach the orange dot before it was smoothly running on top of the XL line. Both of these things are okay. It's the way I like to grade, and it works for me. You will find what is right for you.
Here is an example of what grading out what look like on Feel Pretty pants with legs of 2XL, hip of XXL and waist of XL.

Deciding a waistband is the same as how it's chosen for the kids pants, use the size waistband that corresponds to the size waist you used. So my waist was a 2XL, so I need to use the 2XL waistband with no adjustments. The graded out pants had a waist of XL so the waist band would need to be an XL waistband.
And now I'm off to sew some Feel Pretty Pants, but not before I finish my adjustments!

Grading is not a fool proof way to get the perfect fit! But it is a great place to start, a good place to begin learning how to make your patterns work for you and compliment your figure and style! Now go give it a try and let me know how it turns out. I'll be seeing you in the Facebook Group be sure to tag and/or mention me because I'd love to see how your creations work out!
The links provided in this post may be affiliate links where I receive a small commission from your purchase at no extra cost to you. Thank you for supporting me, my blogging and my sewing!
No comments:
Post a Comment